How to Install Stone Veneer
Installation:
 How to Install Stone Veneer
How to Install Stone Veneer
· Questions Alongthe Way? Give us a call and we can help!
· View Stone Veneer Products
Overview: Getting Started
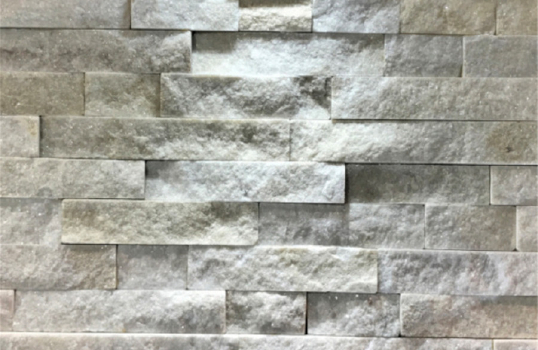
Thin stone veneeris the perfect product for adding a bit of excitement and aesthetic to anordinary wall, column, fire-place, or barbecue. This guide applies to bothnatural and manufactured thin stone veneer.
Required Tools
· Brick Hammer
· Trowels (Brick, Notched, & Flat)
· Joint Tool
· Grout Bag
· Masonry Brush
· Masonry Sponge
· Masonry Saw (Diamond Blade)
Things to Keepin Mind While Installing
· Keep you and your stone veneer cleanduring the installation process. Be sure to keep your hands clean throughoutthe process.
· It is important not to allow mortar to dryon the face of the stone. Remove it prior to hardening. Wet mortar on stonewill leave a filmy residue that dulls the appearance of your natural stone. Usea stiff brush and clean water immediately on your stone to remove the dullresidue.
· Place a protective material on the groundwhere rain or water can cause mud to splash onto your stone.
· All stone should be applied according tolocal building codes. Water infiltration can result in damage caused fromincorrect installation.
· Stone should be installed at least 3"above grade level to prevent water from continually saturating behind the backof the stone and causing structural damage.
Step 1: Calculating Materials
Before you canbegin the installation project, you will need to calculate the proper amount ofmaterial for your thin stone veneer project.
How much Stone do you Need?

Begin by figuringthe square footage of the area you plan to cover with stone (length x height).If your project includes corner stones, deduct 1 square foot for each linearfoot of corners that you will utilize.
Mortar JointSize
One aspect toconsider when calculating your materials is the size of the mortar jointbetween the pieces of stone. Most stone is packaged assuming a 1/2" mortarjoint. If your joint will vary (such as a dry-stack or over grout application)adjust your estimates accordingly.
Need Help? Call and RCP Block & Brick near youand we will be happy to help estimate your material quantities.
Step 2: Surface Preparation
Preparation of thesurface is a key aspect in preventing any water damage and making sure yourstone veneer project remains structurally sound for the life of theinstallation.
Surface Type 1:
Framed Exterior Wall Including Plywood Paneling, WallSheathing, or Flush Metal Siding.

Surface Preparation: Cover surface with a weather resistantbarrier such as tar paper. Be sure to overlap joints 4" in shinglefashion. In accordance with local building codes, install metal lath on top ofthe weather resistant barrier using galvanized nails or screws 6" oncenter vertically and 16" on center horizontally, penetrating the studs aminimum of 1". Stop the metal lath 1" from finished edges. Be sure towrap all corners overlapping the metal lath at lease 4".
Surface Type 2:
Interior or Exterior Cleaned and Untreated Concrete,Masonry, or Stucco.

Surface Preparation: Stone veneer can be installed directly tothese surfaces if clean and absent of any paint or debris. Be sure to inspectnew concrete to insure there is no release agents (form oil) on the surface. Ifrelease agents are present, etch the surface of the concrete with etching agent.Surfaces that have been painted must be sand blasted or otherwise stripped ofpaint. Surface must be free of paint, dust, or dirt. If cleaning of surface istoo difficult, metal lath may be affixed to the surface with concrete nails. Inaccordance with local building codes, install metal lath using galvanized nailsor screws 6" on center vertically and 16" on center horizontally,penetrating the studs a minimum of 1". Stop metal lath 1" fromfinished edges. Be sure to wrap all corners, overlapping the metal lath atleast 4"
Surface Type 3:
Framed Interior Wall Including Plywood, Sheetrock, GreenSheetrock, or Fiber Cement Board.

Surface Preparation: In In accordance with local buildingcodes, install metal lath using galvanized nails or screws 6" on centervertically and 16" on center horizontally, penetrating the studs a minimumof 1". Stop the metal lath 1" from finished edges. Be sure to wrapall corners overlapping the metal lath at lease 4". (It is not necessaryto use expanded metal lath on fiber cement board unless required by localbuilding codes)
Step 3: Scratch Coat
A scratch coatwill be needed when metal lath is used. This step is not necessary whenapplying stone veneer to acleaned concrete, masonry, or stucco surface.
Mixing the Scratch Coat

1 part Type SMasonry Cement to 2.5 parts sand. Dry mix the sand and cement together andavoid creating clumps in the mixture. Add water slowly to the mixture a littleat a time, continually mixing until you have achieved the consistency of a pasteor whipped potatoes. Mix a minimum of 5 minutes.
Applying the Scratch Coat
If a scratch coatis necessary, use a masonry trowel to apply a 1/2" to 3/4" layer
of cement over your metal lath. Cover the entire area of the lath, working thecement into the holes and scraping off any excess. Use a notched trowel tolightly rake horizontal grooves in the scratch coat while the cement is stillslightly wet and allow to dry for 24 hours.
Step 4: Applying the Stone
You will beaffixing the stone veneer to the scratch coat using a stone veneer mortar.Below are the steps involved.

Mixing the Mortar
Use a pre-blended,polymer fortified Type S mortar and water. Call an RCP
Block & Brick near you for available products and tips. Mix according tomanufacturer's directions.

Applying theStone
TIP: Before applying the stone, it is a goodidea to lay the stone out flat to determine the sizing and colors of eachindividual piece, how they will be laid
out for your project, and if any trimming is necessary. Attempt to keep jointsa consistent height and width. Normally vertical and horizontal joints shouldbe staggered to prevent long, unbroken lines that may draw the eye to aparticular area.
Trimming theStone: If cutting the stone is necessary, a Skill saw witheither a dry or wet cut diamond or masonry blade will work. You may also wantto use a masonry hammer to break the stone, giving it a more naturalappearance. A nipper can also be used to trim small amounts off the stone.
Clean the Stone: Be certain that the surface of the s isfree of dust, dirt, or any loose particles. If necessary, wash the stonecompletely and allow to dry.
Installing the Stone: It is recommended to install all cornerpieces first before installing the field. It is also recommended to work yourway from the bottom to top.

Use a masonry brush to dampen the back ofthe stone, but do not saturate it. This prevents the stone from pullingmoisture away from the mortar allowing it to dry naturally and with a strongerbond.
To lay the stone,use a masonry trowel to butter the back of the stone with 1/2" to 1"layer of mortar. Using your trowel, create a ridge around the outside back ofthe stone. This will create suction when putting the stone in place, which willhelp to hold the stone until the mortar sets up. Lay the stone against thewall, pressing and rotating slightly, forcing some of the mortar to squeeze outfreely.

Step 5: Grouting & Tooling
Once the stone hasbeen affixed to the scratch coat using mortar, the joints, or gaps between thestone, will be filled with grout.
Filling the Joints

Use Pre-blendedType S mortar. Using a grout bag, cut a hole approximately
1/2" in the tip of the bag (if hole is not already provided). Fill yourgrout bag about half full with your grout mixture. Twist the top end of the bagand squirt a small amount into a bucket to prevent air pockets. Fill all thejoints between the stones with about a 1/2" layer of mortar (more or lessdepending on the desired effect and joint size.)
Tooling theJoints
As the groutstiffens, tool to the desired depth using a joint tool. Brush the joints with awhisk broom to smooth them out and clean away any loose mortar. Grout is readyfor finishing when it crumbles away like sand when brushed. If the grout smearsor falls away in large chunks, it is still too wet for brushing or striking.Finally use a soft bristled brush to sweep the dust off the stone.
Hot Products


People who liked this story also liked